Decal Installation

VINYL DECAL APPLICATION TIPS
 
READ HERE FIRST - Think of your vinyl decal (lettering or image) in 3D. Your vinyl arrives as a pre-spaced sheet of letters (or images) made up of three layers. (1) the top layer - or transfer tape which holds your decal pieces in proper alignment (you can see the letters through this layer)  (2) the middle layer - which are the letters (or decal) pieces themselves  (3) the bottom layer - or white/blue shiny backing paper.
   
vinyl-decal-installation
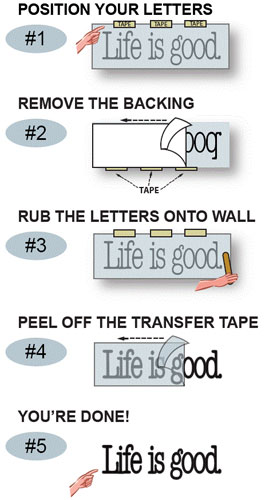
Position your vinyl sheet on the wall, centering the letters, and securing it with masking or painting tape. The tape acts as a hinge for the project. You can see the lettering through the decals semi-transparent top layer.
Flip the lettering sheet upward and slowly peel off the bottom layer. Let the lettering rest on the semi-transparent top layer. If the lettering wants to stick to the backing, slowly manipulate the backing to help the letters stick to the top layer.
Use some kind of semi-rigid, but gentle edge like a popsicle stick or plastic scraper and firmly rub over the semi-transparent top layer to secure the lettering to your wall. Wor from the center out on both sides letting the edge act as a squeegee over the lettering.
Then, carefully peel off the sticky top layer (transfer tape) to reveal your decal. NOW...ENJOY YOUR NEW DECAL!!!
REMOVAL: When it comes time to remove your vinyl decal, remember that the heat of a blow dryer will soften the vinyl and help release the adhesive, making it easier to peel off.